The good, the bad and the ugly
There are countless shibari tutorials in books and online, plus plenty of real life classes but not all shibari tutorials are equal. The quality runs the full gamut of the good, the bad and the ugly. Some teachers can teach, some can’t, some have a wealth of sound knowledge and some are only a few pages ahead of you.
The problem is that the less you know, the harder it is to tell them apart. It took me quite a few years to realise that I didn’t know what I didn’t know. In other words, I had no idea how little I knew. My many peroids of over-confdence were thankfully regularly reset by exposoure some of Japan’s most renowed bakushi (expert riggers). It’s quite humbling when you realise, in an instant, that you know almost nothing.
What makes a good shibari ‘how to’?
To me, what makes a good shibari ‘how to’ will depend on how deep you want to go. Although, I believe you will be missing out if it doesn’t include the following:
Fitness for purpose
In short, does it do what it says on the label in a sensible way?
- Safety: Obviously, a tie should be safe. This is not always easy for the unskilled to assess. However, as a bare minimun, you should look at the basics of bondage safety, e.g. is there slack if it’s needed, will it tighten accidentally, does it create a strangulation or other serious risk?
- Effective: Does the tie do what it should, e.g. enforce a position or create restraint? If it performs those functions, will it stay in place? Is it easy for ugly slack to appear?
Aesthetics
Beauty is in the eye of the beholder but one should always strive to make the rope and the person inside it look good. Generally, this requires working with some neatness and symmetry. Like all rules, they can be broken but usually just to add interest. About the only exception is ‘kazushi‘, a deliberately messy style, which I regard as the jazz of kinbaku.
There are also a few golden rules like ensuring the direction of the rope closes frictions, keeping rope close to the body, using the body’s natural anchorage points, minimising loose ends etc.
Tying techniques
So many shibari lessons that I see and no more than step-by-step demonstrations. In many cases, the demonstrator has a very limited understanding of rope handling techniques. Like using a pencil or paintbrush, how you hold and manipulate it makes all the difference. Think how you used to hold a crayon as a toddler, compared to how you use a pen now. Your control has been transformed and so it is with rope. These little details make all the difference.
If you hold and move the rope properly, you stop fumbling and develop a flow. Your tying feels confident and, therefore, dominant. As your tying becomes more fluid and efficient, your speed will increase and it will become second nature. Once you learn these tying techniques, you become more fluent in the language of rope, which menas you will be able to express yourself far better. We believe that this is so fundamental to good shibari that made a series by the same name: ‘Tying Techniques‘.
“I was actually able to get my princess into subspace with rope for the first time using the techniques you taught in the videos” – Nerdy_Sir, ShibariClasses student
Tying with passion and connection
I have often heard it said that, like an iceberg, nine tenths of shibari is below the waterline. That is to say, that what is mostly visible are the pretty patterns and beautiful positions. However, what is hidden are the secrets techniques (urawaza / 裏技) of how rope is used as a tool of communication and an extension of your hands. Shibari tuition that misses out on that only skims the surface. Sadly, most only show ties as a mechanical process. To fully appreciate the potential of shibari, tying needs to become an intense exchange between the two parties. To achieve this, doesn’t require complicated ties or even a lot of rope, one rope used skillfully (ippon nawa) can be quite enough to have a very powerful effect.

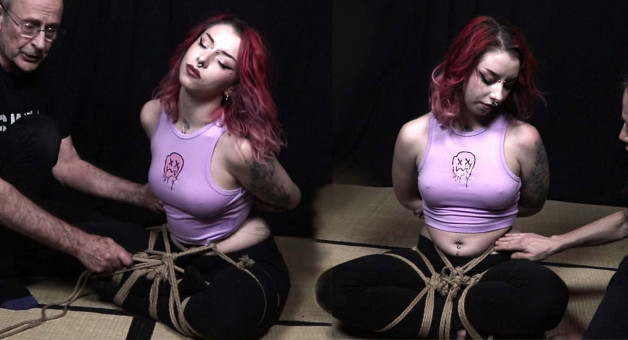
Two shibari tutorials compared
In the trailer for ‘Competent Shibari: Cross-legged tie‘, you will see two shibari tutorials compared. Firstly, I reproduce and critique a pictorial guide from a very well-know shibari manual (centre). After, Nina and I build our versions of the cross-legged tie which actually create the restraint implied by the first tie. I hope this illustrates some of my earlier points. If you are inspired to further your shibari study, you can find the full cross-legged tie tutorial here.
