I have made a number of revisions to my original nerve damage study in the light of experience, discussions with models, fellow riggers and my teachers in Japan, further study of how the top Japanese riggers tie and access to better medical modelling software. That said, we are all different and there will never be a guide that can say “Put the rope there like that and everything will be fine“. Furthermore, some of my theories are just that, so are not immutable or necessarily correct, my only qualification is experience with rope and an inquiring mind. If you know better or can add to the advice herein, I welcome your input. Please check the revision date above as changes will be added. This is will always be work in progress as our knowledge is constantly growing.
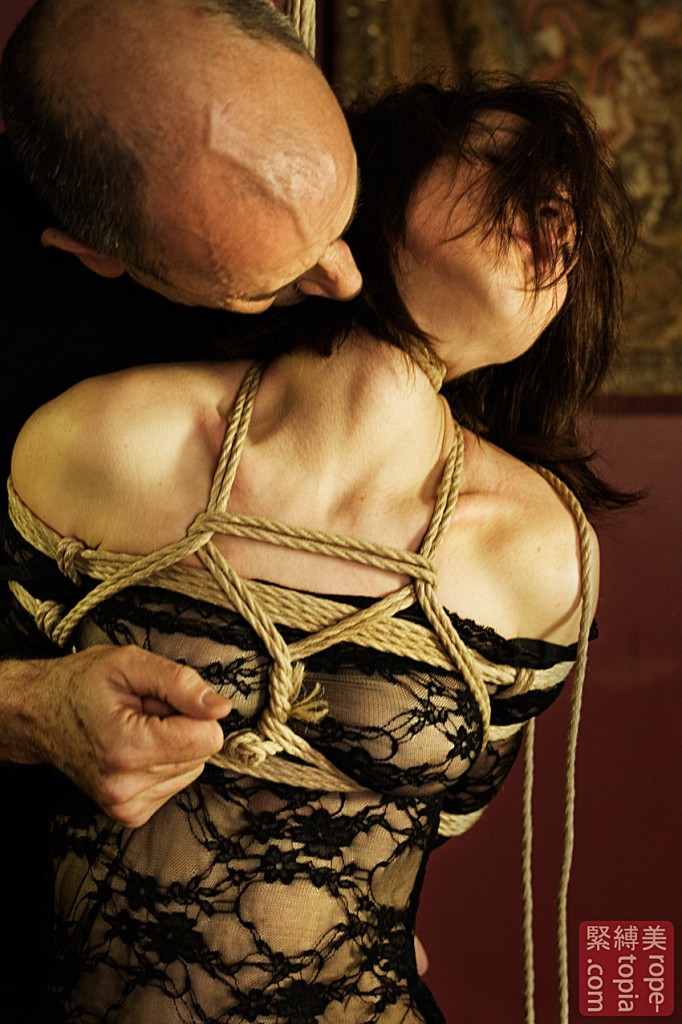
Analysis of upper body nerve injuries
The main focus of this study is injuries caused by upper body ties. In most cases these involve what might be generally referred to as a ‘box-tie’ in western terms. I have used the term box-tie to refer to ties, encompassing the arms and upper torso, often used for suspension. Similar ties are often referred to as ‘gote’ or ‘takate-kote’ within shibari circles. Japanese forms vary considerably in style and functionality.
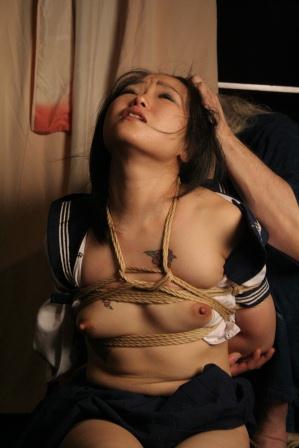
Akechi derived takate-kote. Osada Steve, 2008
Some, like those deriving from the Akechi Denki school, tend to be better suited to dynamic suspension whilst others are primarily only for use on the floor, e.g. Yukimura ryu, or for partial or static suspension. It is important to understand the limitations and use such ties appropriately. For example, you wouldn’t drive a F1 car across a ploughed field or enter a Landrover into an F1 race. The same differences can apply with these ties.
TypicalYukimura gote
The purpose of this document is to examine the construction methods and possible implications for the nerves likely to be affected. We will examine the commons elements and the areas that might cause problems. However, these hazards are not unique to this tie and the information is relevant to upper body bondage in general. Whilst suspension multiplies the forces and inherent risks, similar problems can occur during floor-work particularly if the person tied is lying on a binding or it is under load, e.g. floor-based or partial suspension.
Some of the common mistakes in attempting to execute this tie and the failures of some Western copies are now embodied in an on-going series of articles here.
Whilst most injuries can be traced to inappropriate placement of ropes or poor construction, there still seem to be others which seem less explicable. I hope this document will be the basis from which to explore how risks can be reduced or, even, if this type of tie or its usage can be improved.
Traditional Japanese ‘gote’
The simple form is usually based on two ropes, excluding the suspension rope/s or decoration and reinforcement. This is a general guide to common characteristics:
- It typically comprises two parallel bow-shaped wraps, usually of two doubled bands of rope, one above the breasts and one below, encompassing the arms and torso. The placement of these wraps is critical! Western box-ties seem to employ more parallel bands.
- Wrists will, except in reverse versions, be secured loosely at the rear. Wrist position will depend on whether the style uses low wrists or high wrists in an X-shape or forearms parallel to the ground. The latter being the most commonly seen.
- The upper wraps will normally be under greater tension than the lower wraps. Typically, for Akechi derived versions, the lower wraps should have about 30% less tension.
- Even wrap tension is paramount! Uneven tension can create dangerous pressure and nerve damage, e.g. one rope taking more load = smaller contact area>more pressure per square centimetre/inch.
- One or both wraps should be ‘cinched’ at the front only. If you catch the back of the wrap too, you risk creating a tourniquet effect when a suspension load is applied. The upper wrap cinching is very gentle but a little more tension is applied to the lower. Some versions might not employ cinches (kannuki) but these are rarely used for suspension without an additional upper wrap or some means of otherwise anchoring them, e.g. a central 3rd rope at the front locking the wraps.
- Some or all components will be ‘locked off’ to ensure that each is a separate unit and does not tighten when other bindings are pulled. These frictions or knots must be efficient if the integrity of the tie is to be maintained. In higher stress situations, this is vital. Compact your frictions well.
- Only the two parallel wraps, not the cinch ropes, to be included in the suspension rope/s. This is by no means universal but is the Akechi school practice as it is said to reduce the load on the cinches. This might be correct for versions where the two wraps are separated at the rear. However, when all components are taken to one central point, as in some older style versions, the tension on cinch lines, in my opinion, are mitigated.
- The upper wraps are generally placed around the lower end of the deltoid and the lower wraps about a maximum of two or three fingers width lower, avoiding the area where the radial nerve is less well protected. This is a rough guide and will not be correct for everyone.
In addition to the above, there may be some embellishment or further structural work depending on how much rope is left and whether a third rope is added. The purpose of the third rope is to provide additional rigidly to the form, especially for side suspension to allow one to anchor ankles to it. Regardless, the above components comprise the basic form. Unfortunately, many Western approximations and many tutorials do not take all these considerations into account. Consequently, this can lead to increased risk. Hopefully, this document will also alert people to the risks inherent in some non-standard or reverse engineered versions. Specific risks and errors are discussed after the section identifying the main nerves.
Nerves of the upper body
It should be stressed that every person is different, not just on the outside but equally on the inside. Thus, this document can only provide a general guide. These differences can be marked. An extreme example is Dextrocardia Situs Inversus Totalis, where the positions of organs are reversed, including the heart. The position of nerves and their vulnerability varies between individuals. Just compare the paths of visible veins with some friends and you will see how much they vary. I suspect that nerves are not much different in their degree of variation, so diagrams can only give a very rough approximation. In addition, weight and degree of protection afforded by muscle or fat will be other factors. Individual assessment must be combined with the guidelines in this study; ever then, this does not guarantee safety. Suspensions, especially the Japanese style, are edge play. They are not SSC, they are RACK! Think of it as an extreme sport with the same potential risks. Before copying the pros, consider that they are pros so are highly skilled and have fit bomb-proof models. Owning a motorbike doesn’t make you Evel Knieval…and even he had accidents!
When assessing a person to be tied, the following areas should be considered:
- Past general medical history, e.g. any known susceptibilities, previous injuries that might be relevant.
- Details of any numbness or nerve related problems. It is particularly useful if they know why it happened/what caused it.
- Nerve injury can be cumulative. Repeated trauma is likely to reduce function.
- How well they tolerate the suspension tie during floor work.
- Is the thickness of the rope and the proposed number of wraps appropriate for their weight, body tone and degree of padding. There can be a big difference between rigging for a super-fit 45kg/100lb professional bondage model and Mr or Mrs Average. Be aware that thicker rope does not necessarily safety, apart from obviously offering additional strength in critical applications like main suspension lines (natural fibre rope is not strong or predictable). The downside is more bulk and bigger knots, which can dig into nerves or other sensitive areas. The area most at risk from this is the radial and brachial plexus (upper inner side of arm/armpit).
- You can learn a lot by gently probing for nerve sensitivity. Note whether there are unusual sensitivities or placements.
IMPORTANT! Always ask for feedback during the tie, especially for any unusual sensations, however seemingly insignificant, and act upon it FAST if they might be a problem. I have seen instances where an injury probably occurred due to a rigger thinking he knew better or could fix it ‘on the fly’. The latter requires a lot of skill and very precise instructions from the person tied. If in doubt, untie!
There follows an illustrated discussion of the main nerves, and arteries which supply them, relevant to this tie and, indeed, bondage in general.
The following terms might be helpful in interpreting medical texts:
- Anterior – The front side
- Posterior – The rear side
- Lateral – Away from the midline of the body
- Medial – Towards the midline of the body
- Proximal – Towards the centre of the body
- Distal – Away from the centre of the body
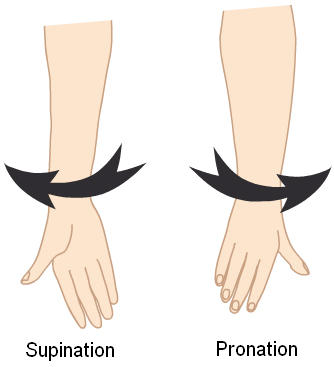
- Pronation – To rotate the arm inward so that the thumb points towards the body while a person is the standard anatomical position. See below.
- Supination – To rotate the arm outward so that the thumb points away from the body while a person is the standard anatomical position. See below.
- Extension – When a joint is held straight out (opposite of flexion)
- Flexion – When a joint is bent (opposite of extension)
Nerve damage duration:
Times involved are hard to estimate, but will partly depend on the spread of focussing of the compression, the weight of the person suspended, and the concurrent presence of blood vessel compression. Be aware that serious nerve damage can happen very quickly and often without warning. Incident reports have show this damage can occur in seconds. Consider this before you experiment with suspension or tight bondage.
- Short term compression – tingling and loss of sensation.
- Longer term (minutes) – loss of motor function (neuropraxia).
- Longer still – longer recovery time.
- Even longer – possibility of permanent injury (neurotemsis)
Recovery time depends a lot on how badly the nerve is damaged. It may just take a very short time if the nerve is mildly compressed. However, if the structure of the nerve is damaged, it can take weeks or months. A nerve is made up of thousands of nerve fibres held together in a bundle. Each fibre that has been disrupted will die back along its track to where the body of the cell is located which is right back to the spinal cord. It can regrow from there usually at a rate of about a millimetre a day. If the nerve sheath is not disrupted, then the individual nerve fibres should be able to find their way back to the sensory or muscle ending that they were originally connected to. In severe cases, surgery might be required to regain use.
A sketch of a dissected body, showing the nerves of the hand, can be found herein Gray’s Anatomy. Starting at the wrists, you have three main nerves: ulnar little finger side), median (inner wrist) and radial (thumb side). The median isn’t easily compressed by ropes, even under suspension as it lies deep within the carpal tunnel running up the middle of the wrist. People with Carpal Tunnel Syndrome are probably the exceptions as fibrous tissue fills the tunnel and leaves less room for the nerve.
The real problems are the other two nerves, radial and to a lesser extent ulnar. Let us examine how and where injuries can occur and thus what to avoid.
Wrist ties
Tying wrists overly tightly, so as not to permit enough movement and slack, seems to be the most common mistake I encounter, even with quite experienced students. The main purpose of the wrist tie is more to support the forearms than restrain as this is done largely by the torso wraps going around the upper arms. This being so, it is not necessary to make the wrist tie tight and I tend to leave much more slack than a normal wrist tie.
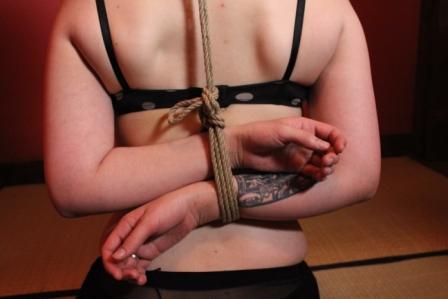
No less safety space!
Why is more slack needed? Firstly, during a suspension the arms are likely to be forced inwards, thus the forearms are pushed into the wrist binding. Forearms are much wider than wrists so the rope becomes tight. Secondly, it also removes the important ability to move the arms to relieve discomfort or nerve compression. It is a vital skill for rope models to learn how to identify the early signs of nerve compression, e.g. odd twinges or electric type sensations, and communicate this to the rigger who should act instantly.
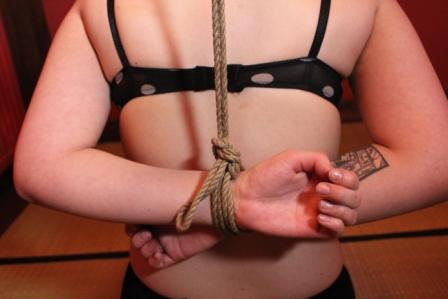
Too tight & close to wrists
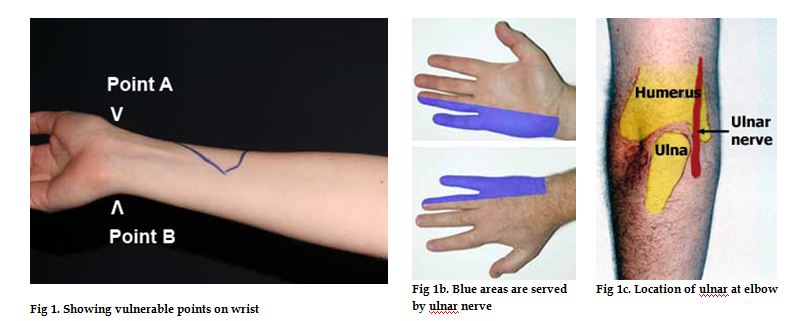
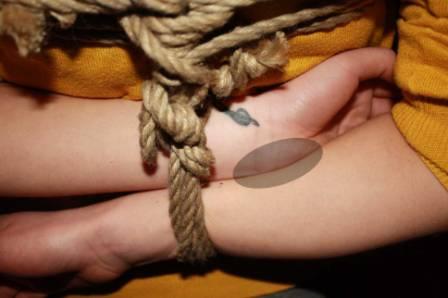
Take care not to apply too much pressure in the area from above the notch at the base of the thumb (Fig 1, Point A) to about 2cm (1″) up the forearm as this is a common area of radial nerve injury. On the other side, you’ll feel another notch at the end of the ulnar bone where the forearm ends and the hand starts (Point B), see Fig 1, where the ulnar nerve can be at risk, although it appears less easily injured than the radial. At both these points, the nerves are running near the surface over bony prominences, making the nerve compressible by overly tight or thin, i.e. narrow diameter rope or insufficient wraps, wrist bindings cutting into this area. Also watch out for the knot being driven into the radial on the upper wrist, as in the photo above.
When tying a gote, the wrist tie should incorporate a locking knot, or other mechanism, that prevents the tie from tightening. I prefer to add a second knot to prevent the first loosening or capsizing into a slip knot. In general, it is safer to ensure you run the bight under the wraps to avoid secondary tightening. Whilst several old-school kinbakushi do not seem to do this, they know what they are doing and the problems involved. I believe this is one area where technology has moved on and it is a risk best avoided by the rest of us.
Arm and hand position
One should adopt an arm position that feels natural and does no cause torsion of the upper arm muscles. I am veering away from encouraging placing arms so that inner wrists are together as often advised in the west and prefer to let my partner take their preferred position.
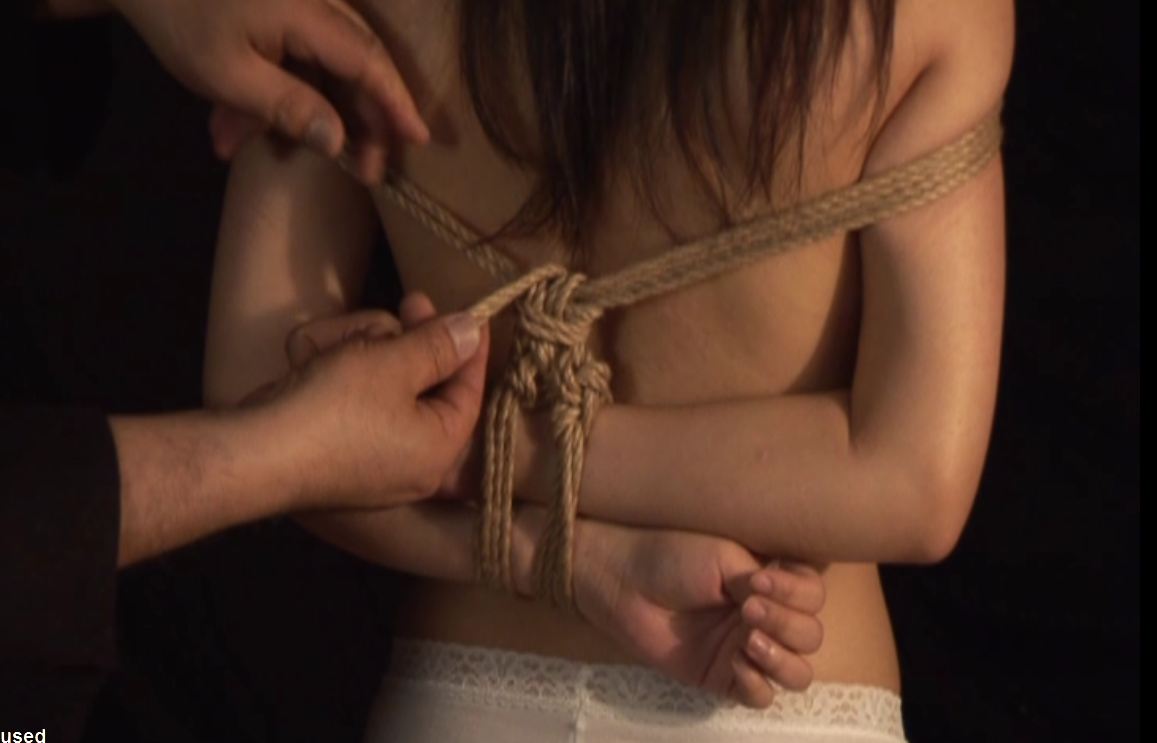

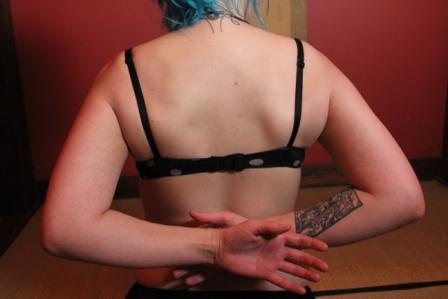
I have noticed that Japanese models adopt a position with both inner wrists facing backwards and forearms stacked one on top of the other with hands pushed towards the opposite elbow (see above for an example featuring an unusual double wrist tie). This has the advantage of placing the, in my opinion, more vulnerable radial nerve away from the main pressure point, which is likely to be at the bottom of the loop should the rope move into this area. True the rope runs across the veins of the outer wrist but the pressure there should be low, as the load is on the underside.
Insufficient flexibility
Good flexibility is important so the tie will not be right on the wrist. If one cannot put ones fists close to the inside of ones opposite elbows behind the back, the tie will be at the wrist near the danger points A & B indicated on the photo thus risking injury at the wrist. In which case, a modified tie might be advisable. I believe proper arm position with a fairly gently wrist tie is a good way to ensure safety.
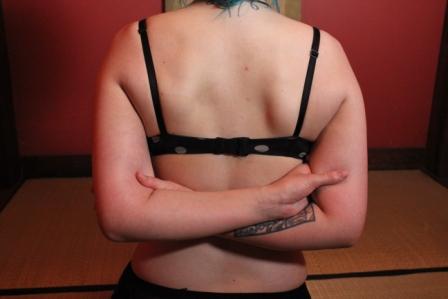
During suspension, it is not advised to lock thumbs into elbows as this can create uncomfortable strain on the thumbs and restrict the ability to change arm position when under load.
Don’t lock thumbs!
The shaded area on the forearm where the radial nerve runs over the bone can be sensitive (see below). Although it is unlikely that rope will subject pressure here, I have encountered a case where the model inflicted injury by trapping the nerve between the bone and the heel of her hand with additional pressure from suspension.
On a more general note, one should be aware of the vulnerabilities at the wrist when applying any ties that might come under load, e.g. hands behind head, hog-tie, tied overhead. The load can cause the bindings to cut into these sensitive areas, as can escape attempts or other struggling.
Try to keep at bindings flat, ropes parallel and uncrossed with even tension to avoid pressure spots. Some people prefer an extra wrap at the wrists. Ultimately, the tie should suit your partner. Don’t try to make them fit the tie.
We will now move up the arm.
Ulnar nerve
A sketch of a dissected body, showing the nerves of the arm, can be found below from Gray’s Anatomy (click to enlarge).
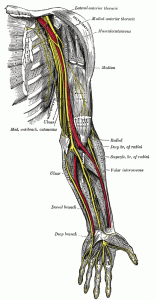
Avoid the “funny bone”, aka humerus, where the ulnar nerve runs over the bony prominences of the ends of the humerus and top end of the ulna (Fig 1c). Compressing here gives similar symptoms to whacking it (the “funny bone”) i.e. tingling in the inner (little finger) half of the hand (see Fig 1b), and depending on degree of injury might also lead to weakness in the fingers, loss of grip strength and precision.
Injuries to the ulnar nerve may also occur if the arm is very tightly bent (>90 degrees) at the elbow for prolonged periods; if the arm is twisted inward so the thumb faces the body, tension on the ulnar nerve is further increased (think of the way you hold your arm while imitating a chicken wing or as in a wrist to upper arm tie).
Symptoms of ulnar nerve injury:
- Abnormal sensations in the 4th or 5th fingers
- Numbness, decreased sensation, especially in areas marked blue in Fig 1b.
- Tingling, burning sensation
- Pain (usually only if teh nerve is ripped or overly stretched)
- Weakness of the hand
Median nerve
The median nerve in the middle of the front of the elbow is difficult to compress, as it’s deep and surrounded by soft tissue, but with enough pressure the radial artery can be compressed, leaving the lower arm short of blood & oxygen. This point is just proximal to the bony parts of the wrist with the hand supine, where the pulse is normally taken. This remains vulnerable in a straight line up to about half way to the elbow, at which point the increased muscle bulk around the deeper running artery will be protective. Compression is both painful in itself and after a few minutes can start to cause early tissue damage. Releasing the pressure the causes more pain as the blood supply returns.
Avoid the back/inner upper humerus (5-7.5cm/2-3 inches below the armpit) as the lower branches of the brachial plexus are compressed against the bone of the upper arm here, this time including the median nerve (causing major functional problems for the elbow and hand).
Radial nerve
Symptoms of radial nerve injury can affect the following:
- The hand or forearm (dorsal surface, the “back” of the hand)
- The “thumb side” (radial surface) of the dorsal hand
- The fingers nearest the thumb (2nd and 3rd)
The following symptoms might occur:
- Numbness, decreased sensation, tingling, or burning sensation, especially in the un-shaded areas in Fig 1b.
- Pain
- Abnormal sensations
- Difficulty extending the arm at the elbow
- Difficulty extending the wrist
If the injury is at the wrist, patients complain of isolated sensory changes and paresthesias (unusual sensations) over the back of the hand without motor weakness, e.g. wrist drop, inability to grasp firmly. If the injury is high above the elbow, then numbness of the forearm and hand may be an additional complaint.
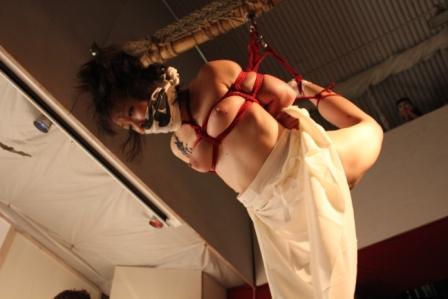
Kinoko Hajime at LFAJRB 2011
The radial nerve is vulnerable at the wrist as mentioned above. In addition, it is also prone to injury where it twists around the outside of the arm. You can explore 3D images like the one below at Biodigital Human:
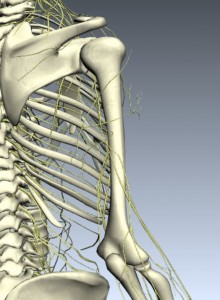
Path of radial nerve
I suspect that a substantial number of injuries are the result of compression of the radial nerve by the lower wrap, rather than the upper wrap as has been previously suspected. This will be explored further in Part II.
Since it is included in the brachial plexus, compression in the underarm area can also occur. A branch of the radial nerve near the lateral and posterior portion of the wrist does run close to the skin surface (see Fig 1, Point ‘A’) and tight ties in this region may lead to numbness along the back of the hand.
In the diagram on the left below, you can see the path of the radial and in the second photo you can see it traced on my arm. The red spot is for reference. In the final photo, you can see the red spot has moved towards the outside of my arm.
NOTE: This is where my radial runs. There is no guarantee that your partner/model will be the same.
In the left-hand picture below, so you can see how the nerve appears to be affected by the change of position, the third photo is superimposed on the first diagram. The right hand photo gives a better idea of the path from a side view.
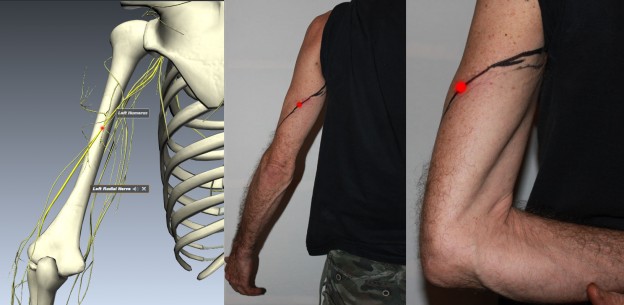
This would appear to be the evidence that lower wraps should be higher than is often the case. I believe westerners tend to tie the upper wraps a little high, although this does not appear to cause nerves issues, it can lead to the wrap slipping out of place since placing the wrap at the very lower end of the deltoid provides a natural ‘stop’. However, they then seem to leave a large space between the wraps, which tends to place the bottom wrap too low, which can then stray into the area where the radial is at risk. The next section, Part II, will examine some examples.
Brachial plexus:
In the armpit, all the major nerves to the upper limb are branching after emerging from the neck and upper thoracic spine, see below. They pass through the soft tissues beneath the shoulder joint. This is pretty well protected from above by the joint itself, behind by deltoid and trapezius, and from the front by the pectorals. Underneath, though, these nerves are vulnerable.
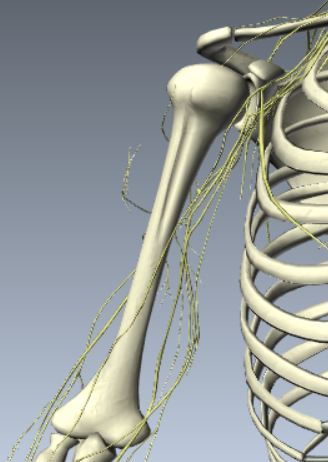
Restraints should never be placed around and under the armpit as this will almost certainly lead to compression of all of the nerves that supply the arm. It’s not just compression, but also excessive stretching, which can happen if the body is suspended with arms above the head. Obviously, the risk, and speed of onset of any injury, is greater in those who weigh more. This is also a risk if the arms are pulled behind the back, as in a hog-tie or strappado (below) , when the head is turned to the opposite side, and when there is downward pressure on the shoulder.
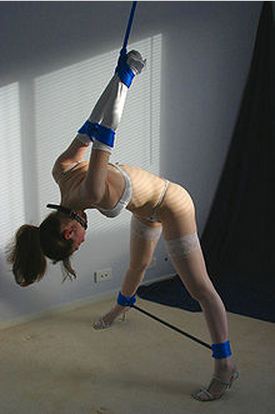
Strappado by JBC Productions / Aussie Rope Works
While certain scenes may require positioning that puts stretch tension on the brachial plexus, moving the person in bondage to the position slowly and steadily (without sudden movements) and minimizing the aforementioned pressures may help make arm restraint safer.
However, while nerve damage to the areas discussed may appear to be the source of change in sensation, in fact there are times that the pain is actually the result of compression of the nerve points around the vertebra. For instance, suspension with the head in a plane that might deform the natural position of the vertebrae; thus, pinching the nerves coming out at the vertebra. This situation is very highly probable in horizontal suspension when the head is unsupported. Often the sensation of pain from the cervical pain is manifested at a distance from the vertebra and could include sensation along the radial nerve right to the finger tips.
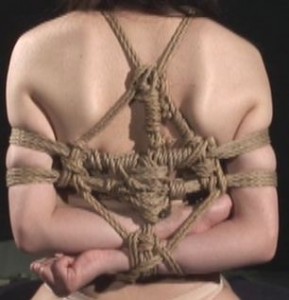
Miura Takumi gote
Summary
There are many variables, knock-on effects and bio-mechanical issues; there is no magic formula which avoids all risks.
The next section, Part II, will examine some of examples of rope placement and specific dangers.
There is no medical specialisation in bondage related injuries, so creating this expertise is down to us. Your peer review, anecdotal evidence, field reports or expertise can all provide valuable input and correct errors. The success of this project depends on your feedback. Please email me with any details of incidents, comments or additions: bruce@esinem.com
In spite of all the best care and knowledge, shit happens. All we can do is be aware of the risks and how to minimise them.
With thanks to: Vitimin A, Sluttylatexboy for their medical input and those who have shared their experiences.
Please link to or circulate this information freely. However, it would be courteous to include this message with the following:

Tuition information & bookings
Information on monthly courses, private tuition, teaching at your event or club: Click here
I also have a set of tutorial DVDs: Japanese Rope Bondage: Tying people not parcels. Available from Amazon, Alibris and my shop
Rope shop
A wide selection of natural fibre rope, including jute, hemp, cotton at great prices. Many items have free international shipping: Esinem Rope eBay shop
