As those who follow my ranting will know, I regard Douglas Kent’s ‘Complete Shibari’ tutorials like the curate’s egg: good in parts. The good parts are excellent and well-researched but in others he is clearly out of his depth or venturing into ‘shambari’. In many ways, he has raised the bar in bondage tutorials with the clarity and range of material that he covers. I understand he has some experience in writing technical manuals and it shows in the professionalism of most of the presentation. When I cast my mind back to my first attempts at making tutorial DVDs, I shudder at the production values and content. I am so glad it never saw the light of day as I doubt my reputation would ever have been redeemed. It is certainly no easy job producing quality tutorials and I take my hat off to Mr Kent in the areas where he has obviously presented within his skill set. It is a shame he seems to have got outside his comfort zone in others. Of course, given that our cousins across The Pond haven’t been exposed to teaching from the masters of Japan to the extent of the rest of us here, it is not surprising that knowledge is somewhat behind overall. Just in the past few months, Yukimura, Kinoko and Kazami have all been teaching in Europe. On top of that, many of those attending these courses are themselves teachers so disseminate the information within the local communities. Sometimes when you don’t know, you don’t realise what you don’t know. Each visit to my teachers in Japan gives me that feeling.
One main criticism is his superficial teaching of the box-tie. Rather than just being critical, I’ll try to do something more useful for those who might be trying to master this deceptively complex tie by explaining, as far as is possible in writing, what I feel is missing or defective in the tutorials. At least, those having read ‘Complete Shibari’, who might have learned the steps of a box-tie (takate-kote aka t-k), will realise there is a lot more to it and might avoid some dangerous mistakes. I would certainly be concerned about anyone attempting suspension based solely on these books and would urge anyone thinking of doing so to seek hands-on professional guidance.
‘Understanding the Box Tie’ begins on p18 of ‘Complete Shibari: Land’ by stating there is no absolute standard for tying shibari’s signature tie. Whilst it is true there is no one box-tie, there are undoubtedly a number of standardised variations with many of the modern versions owing much to Akechi Denki’s original design. You can see the influences at work in the derivatives taught by Osada Steve and Kinoko Hajime. Indeed, Kent unsurprisingly, as these ties have become ubiquitous in the west, seems to be using this broad form for the basis of his examples. Having learned both these t-k’s first-hand through personal tuition, with some particularly relentless 1-2-1 drilling by Steve, I think I have a good understanding of the engineering and can judge what makes a good one. The general principles are, however, applicable to almost all types of t-k.
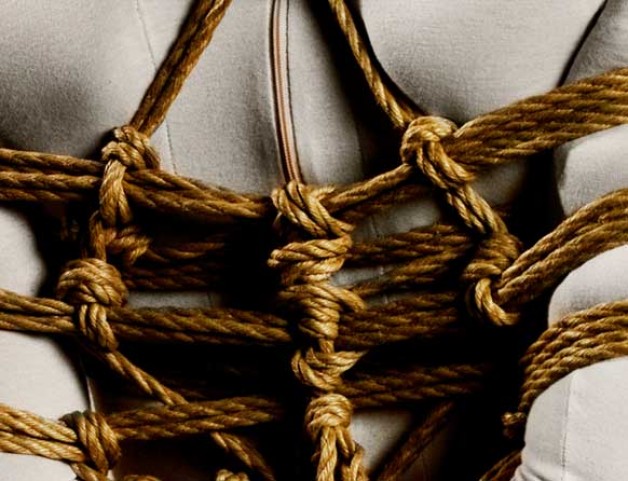
DK seems to fall into the trap of merely describing the steps whilst omitting some vital details and executing others with little undertanding. For example, in ‘Isolation’ he explains the function of frictions but fails to mention that their effectiveness relies on compaction. They need to be really tightly formed or they might as well not be there. I’d like to see this illustrated consistently in the actual ties. To me, quite a few of the frictions look ineffectual, e.g. p58 bottom left, x-friction on top wrap. Although, it probably wasn’t able to get full effectiveness on the second part of the X as it is more normal to create a ‘brake’ by making a turn around the vertical to finish the friction so it ends up more like a triangle, as illustrated in the header image.
I shouldn’t be too harsh as the ‘Frictions’ section, p38 et seq, is superb. The various types of friction are well-tied and clearly demonstrated. I would be proud if I’d produced that. Bravo! Although, it seems if he had paid attention to steps in Style C on p39 he might have fared rather better with the upper friction on p58! Why doesn’t he tie like he does in ‘Frictions’ elsewhere in the books? The rope looks a lot more suitable in this section too, so maybe that helps with the look?

In the box-tie tutorial, I am pleased to see that he mentions leaving the wrist loop “loose enough to be easily escapable”. However, one needs to allow for the arms being forced inwards by suspension forces, since, as forearms taper, the slack can easily disappear as they move inward. Again, he doesn’t always seem to practice what he preaches. OK, so none of us are perfect but surely producing a tutorial is one area where one should strive towards it? In my opinion, the pose at the bottom right of p18 shows the problem. If the model moved her arms into the position of the model pictured directly above, there would be no slack left. It is very important to leave a lot of room so arm positions can easily be changed and to avoid having the underside of the knot of the wrist tie pressed into the radial nerve (near the bony protrusion on the thumb-side just below where a watch strap might go). I have to admit that I no longer advocate attempting to place inner wrists together and favour the ‘both inner wrists facing backwards’ style shown in this tutorial, for reasons I state elsewhere on this site. However, I would caution against locking the thumbs into the elbows as lighter haired model is doing. Nina says she finds this restricts her ability to find safe positions and it can place an alarming amount of strain on the thumbs during suspension.
 I have written at length about the single column tie in the takate-kote. One of its primarily characteristics needs to be that it will not tighten. I’m sure DK covers tying this correctly somewhere but like so many of us, he seems to have a problem performing it correctly. In order for it not to tighten, the longer end of the rope should not follow a straight line into the knot, it needs to form a twist around the bight to lock it. To remain closed, it must be pulled very tight and it relies a lot on the friction of natural fibre to stay put. You can see on p32 of Sky (above) that the knot at the wrist is coming undone and the upright (longer end) runs straight into the knot without the locking turn so forms a slipknot. This might be due to the slippery synthetic rope he has chosen to use but due to this problem, I avoid it. IMHO, he has made a cardinal error in allowing far too little slack in the wrist loops for a suspension for the reasons stated earlier. Once again, one should aim for better wrap placement than that shown, as the gap between wraps on the left differs from the right. On closer inspection, the frictions seem to leave a lot to be desired. Of course, it’s something of a challenge to create proper frictions with slippery synthetic rope so it’s best to use natural fibre for shibari due to its grip (see upper right close up). It’s a little hard to see but the third component of the upper friction seems pretty slack and the lower friction seems compacted on the left and loose on the right. The last element of this friction seems a little odd but it might be that I’m used to seeing upper and lower cinches. The important thing is for frictions to do their job properly. Use the right rope and be sure to compact them well.
It strikes me as strange that an uncinched t-k should be used to demonstrate a side suspension connection (Style B, p33). It is pretty rare to see any notable Japanese nawashi using anything other than a 3-rope t-k for a side suspension, let alone an uncinched 2-rope one. The cinches are there for a reason in this case, to keep the upper wraps in place, so I wouldn’t advise beginners to omit them. That said, they should be treated like a car seat belt which is there to save you if all your other precautions fail and not a substitute for safe driving! I see he suggests using Lift D, which uses the bight. Whilst, this is fine for limbs, the bight is a point of wear and thus potential failure as DK points out on P11 of Sky. I advise students not to ‘burn the bight’ for main suspension lines and I am at a loss as to why he shows this method as a method for connecting a main suspension line after condemning it in ‘Sawing through the bight’. In real life experiments, it actually seems that the bight strips fibres off the rope running through it and the running rope usually fails contrary to what I expected. He even says “Don’t use a Limb Lift D on a core body part’, yet there he is instructing us in it on p33 for exactly this purpose! I would suggest it is better to use the inverted-Y for this type of connection. One can lock it off by passing the working end through the bight and use the apex of the Y as the pulley or a ‘biner hooked in there. In fact, he demonstrates the former on p90 of Sky. Looking at some of the pictures, I can’t be entirely sure how he’s finishing off the suspension lines. In some cases, it appears he is sword hilt wrapping then just tucking the ends through. If that is all he’s doing, I would urge caution in emulating it. I’d like to see at least two half-hitches added since an inadequately secured sword hilt wrap can unwind very fast. Not a good thing to happen with a main line!
Maybe it is mentioned elsewhere but it should be said that the cinches have an important function. The primary purpose is to help keep the wraps in place, particularly when making transitions to different orientations. This becomes essential when tying over slick fabrics like a zentai suit or kimono. It is all to easy to underestimate the lack of grip compared to skin and find your wraps moving or even coming off the shoulder. It is important that these cinches should not be drawn tight and should merely be snug. Be very careful not to allow twists, or worse knots, to lie in the sensitive underarm area where the upper cinch runs. In my opinion, the upper cinch has the major functionality with the lower adding a little tension to the bottom wrap. I see the lower as largely aesthetic, filling in the space between arm and torso whilst forming the rope more attractively to the body.
The right hand photo in ‘Cinching the ropes III’ (Land, p19) raises my main criticism of the box tie tutorials. Namely, the wraps are uneven, with there being twice the gap between the ropes on the right compared to the left! Why is it not possible to show a tie where the wraps are equally placed?! Osada Steve drummed it into me that wraps should, once the correct placement for that person has been established, always be in the same place and equal. My advice is the pick a ‘landmark’, like the underarm fold, that you can use as a reference point to guide you to the correct placement every time. Then use a rule of thumb, for example three finger widths, to see where to place the lower set. Unless you do this, you are merely using a scatter-gun approach which is bound to hit the nerve sooner or later. Accuracy is all! Tie without consistency and it is just a question of time before you get it wrong. When I took classes with Steve, he would check the rope marks left after I had tied several t-ks and I’d get an ear bending if they weren’t on top of each other.
As for the method for ‘Faster Cinches’ in ‘Cinching the ropes IV’, I prefer to use one forefinger to lift the wrap and the other hand to pull through since this reduces the likelihood of the rope being trapped between skin and wrap. See? I can be nice. I’m not always deserving of the Fucking Evil Bastard moniker. You’ll see me show this technique in my instructional DVDs. Of course, the method he shows is fine over clothing, if in FEB mode or very careful.
The technique in ‘Preventing pinches II’ should be about a lot more than preventing pulled skin. It is fundamental to equalising wrap tension and also helps to make sure nerves and muscles can settle down correctly into their natural positions. The apparent lack of any mention of wrap tension is a major omission and perhaps one of the most important aspects of this tie. To do its job, tension must be correct. In this style of t-k, it is generally considered that the upper wrap should be snug but not sloppy or crushingly tight. The lower wrap should be about 70% of the tension of the upper wrap. These are not mere details, they are basic requirements for the engineering to work, like the specifications of beams and joists in building construction. Not only that but the individual ropes of each wrap should end up with equal tension to avoid creating unequal loading of the lines and thus higher than normal pressure which might cause unwanted discomfort or nerve damage. You can see when tension is unequal as the wraps will not be in the same plane, with tighter wraps digging in and looser ones standing proud. The wraps should form flat bands to distribute load most efficiently. ‘Clearing the wraps’ by running ones fingers around will achieve this important adjustment if done correctly and is a key step in tying a good t-k. In fact, one is applying gentle pressure to the rope between thumb and forefinger whilst sliding them along the rope and lifting it clear. Again, the devil is in the detail. This method also allows the position of the rear friction to be centralised or fine adjustment to be made to wrap height. If one studies the illustrations throughout the book, one should become quite adept at spotting where this has been omitted or skimped. The telltale is, as I said, some lines standing proud of the rest or unequal compression of the flesh. A classic example can be seen in Fig 1 on p32 of ‘Complete Shibari: Sky’. You will see the upper wrap on the left of the picture seems to increase in tightness from top to bottom, whereas the other side is much flatter and better tensioned. However, there not only seems to be an imbalance in the distance between the wraps on each side but the right-hand side is cutting in more indicating greater tension. Another giveaway that the lower wrap hasn’t been cleared is the small skin pinching gap of the right lower wrap.
 The examples on p32 (left) and p47 et seq of Sky has so many mistakes that I use them to test my students to see if they can spot them. I wish I could say this was the only example of uneven wrap placement but if there is one thing DK demonstrates consistently it is this! Considering it is all the more critical in a book teaching suspension, it is actually pretty hard to find a box-tie anywhere in the Sky that meets the criteria I have set out above. For God’s sake, for a photo one can spend all day getting everything exactly right, so there really is no excuse not to providing better examples in a tutorial and I have said as much on a number of threads. A while back, I had an email from DK pleading “Enough already” on this subject. I replied that if he could justify his wrap placement, I would publicly apologise and shut up from there in. Meanwhile, I’d stand by my critique. I’m still waiting for his reply many months later. Anyway, here are the offenders that spring to mind:
Land:
p19, photo 2, row 2: Uneven wrap heights and spacing
p20: Same model with equally spaced wraps but at very different heights
p21: Numerous examples of uneven wraps spacing
Sky:
p32: Uneven wrap heights and spacing, uneven tension, incorrect lower wrap friction, uneven compacting of friction, ‘pinch gap’ in upper right wrap, incorrect wrist tie knot, wrists too tight.
p46: Uneven wrap heights and spacing
p47: Uneven wrap heights and spacing
p48: Uneven wrap heights and spacing
p49: Uneven wrap heights and spacing (and a very poor friction)
p72: Although one cannot see the wraps clearly, this one deserves an honourable mention for the appalling lack of tension in the Mt Fuji (see below)
p73: Uneven wrap heights and spacing
p74: Uneven wrap heights and spacing
p75: There’s that dodgy Mt Fuji again.
p81: Uneven wrap heights and spacing
p88: Ineffectual uncompacted frictions
p90: Ineffectual uncompacted frictions
 To the left, you can see the really sloppy Mt Fuji which I mentioned above. Below is how a Mt Fuji should look in terms of tension after a suspension session. Yes, I know it isn’t a standard Osada/Kinoko version and it would have looked prettier without the join at the front but I’d say it was good example technically. I believe it exhibits all the required qualities, i.e. good tension, flat clean and even wraps, accurate placement etc, and it certainly did the job without losing tension or moving out of position.
OK, now it’s your turn. Let’s see what you have learned and how many examples of poor frictions, twisted ropes or badly tensioned wraps that indicate the they might not have been (adequately) cleared. I know it’s pretty easy to get twists, particularly in live tying. I think I have a few in my video tutorials and teachers far greater than I will ever be have done the same, so let’s not too hung up about that one. So long as twists don’t cause a problem, it doesn’t really matter. In many cases, they can actually enhance the beauty of a tie. I love the raw organic quality of old style kinbaku with its crossed and twisted messy rope. To me, it is the difference between a crisp newly made bed and musky sex-rumpled sheets, both have their appeal. I hope you come away with a fuller understanding but please don’t think this, combined with Complete Shibari’s tutorials, are a comprehensive guide to tying a proper t-k. You won’t learn that on paper. I have tied 1,000’s but all the time I learn something new. A little knowledge is a dangerous thing. If you would like to further your understanding of this key stone tie, of course, I’d be delighted to teach you or sell you my DVDs. I can’t give it all away for free, I have to eat you know 🙂 That said, I can only teach you what I know now and that certainly isn’t everything but I hope that knowledge will continue to expand. I’m always happy to receive critique to move towards this goal.

Photographs from ‘Complete Shibari: Sky’ by Douglas Kent reproduced under Fair Dealing copyright exclusion