Like many of us who have been influenced by Osada Ryu, tying to the left has been the direction to go according to the technical specification. Some of us have debated at great length whether tying one way or another has any specific advantage but nothing really convincing has ever come up to favour one direction over another. A lot simply don’t care or tie which ever way seems most natural. As I believe I have mentioned elsewhere, one determining factor, beyond which feels better to you or whether you prefer to lead with your dominant hand, is ergonomics. In other words, what is the best way to work smoothly and economically? Efficient tying is effortless and graceful. You won’t see the great bakushi fumbling or doing things the hard way. Watching and analysing their work will help you enormously if you pay attention to the detail.
Traditionally, it has been taught by Osada Steve that you drop your rope to the right and when I asked him about it recently he still does. I was interested to see Yuginawa Max, the senior Osada-ryu instructor, dropping the rope on the left in the videos. To me, this made more sense as there is no need to throw the rope to your left before you start, which seems a wasted movement. Steve disagrees and says more throwing equals more sabuku (see definition below). I won’t attempt to work out whether throwing trumps efficiency or vice versa. I am quite sure these two eminent gentleman are quite right for their own reasons. For me, it’s more a case that I’ll tie the side I dropped my rope or drop my rope on the side to which I plan to tie, always assuming I remember.
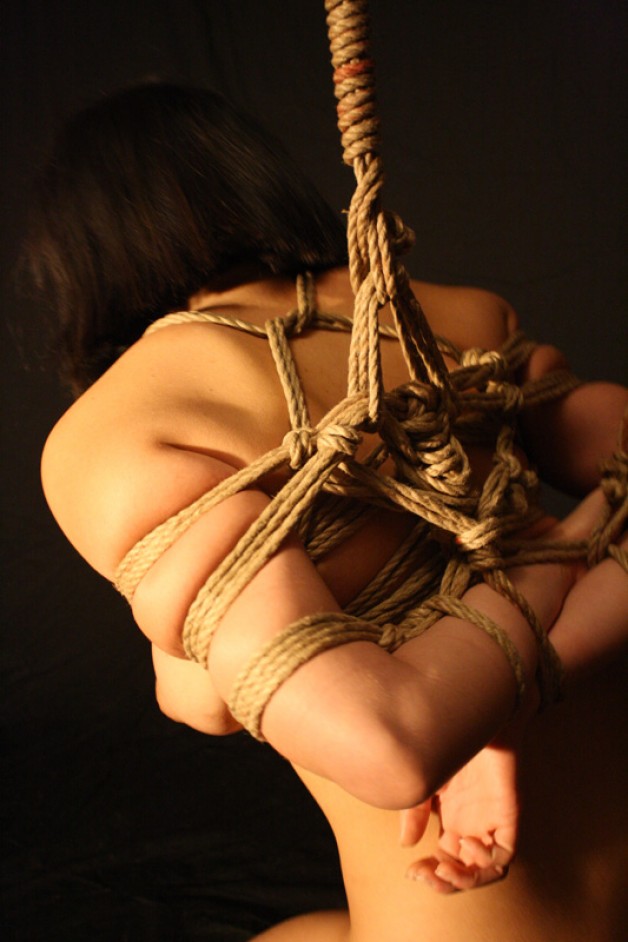
Last night, whilst teaching, it struck me that there was another factor. This being that it depends on how you tie the wrist knot. It might also be determined by if you are left or right handed. Anyway this is why it works for me and it is dependent upon the way I tie the knot. My ‘fast method’ is, once you have made your two wrist wraps and are about to pass the bight under them, as follows:
Push your left index finger under the wraps to catch the bight and pull it through
- Holding the longer end of your rope in your right hand, keep the rope on your left index finger to adjust the wraps and ‘walk’ the crossover to the top.
- Extend your left thumb with your palm towards you, keeping the bight on your index finger, then make a clockwise loop around your thumb with the longer part of the rope.
- Back the rope up a little making this loop larger so you can use your thumb and index finger to flip the bight through
- Close the knot by pulling each end outwards towards the model’s elbows
If you did this right, you will have not changed hands and your rope can be taken directly anti-clockwise to the right shoulder in your right hand. Admittedly, it takes practice to achieve step 4 slickly but it is worth it as it such a fast and foolproof method. I really need to post a video to explain it properly but at least I have one here that explains my ‘fast method’ of doing the yuki knot.
When I have tried other methods or tied clockwise Osada style, I find I have to change hands after tying off the wrists and, if I dropped my rope to the right according to the book, throw it across. If I can avoid having to throw my rope, unless I want to do it for effect, and unnecessarily changing hands, that’s a bonus in my book. That’s why, if one is splitting hairs and counting split seconds, right is right. Tying faster is tying smarter, tying lightening fast is tying faster AND smarter. Of course, it isn’t a race but smarter tying can allow you to be less intrusive or express your dominance through effortless efficiency.
Other than the above, I can’t think of any advantage to going one way or another. I’m told that Akechi tied to the left as he was left-handed, so perhaps he taught it that was and it has been handed down unquestioned to Kanna and onward to the likes of Steve and Kinoko. It is perhaps indicative of the Japanese tendency towards compliance and not questioning their sensei. I’m afraid I’m one of those people when shown something new usually asks “Why do you do it that way?” and is not happy with ‘That’s the way it is done’. It is quite possible there is some far deeper reason that my ignorance prevents me from seeing and it is yet to be revealed by the Grand Nawashi (address as always: atop Mt Fuji) if I am so fortunate but I’m not holding my breath. Meanwhile, I don’t plan to feel obliged to tie in only one direction because somebody’s teacher’s teacher’s teacher was left-handed. Of course, I suppose there might be some advantage in learning to tie arse about face as it makes what might be unnatural feel quite natural in a fairly short time. Being able to tie and untie ambidextrously is a definite advantage. The more you can do with your non-dominant hand, the more time you have to do fun things with the dominant one 😉
It is also interesting to see the divergent methods between Kinoko’s and Osada’s finishing of their 3rd ropes but that’s food for another article. As they say, there is more than one way of skinning a cat or, as an ex-sales manager of mine would put it more colourfully “There’s more than one way of fucking a pig”…he had the look of one who might have practical experience in the art 🙂 What matters at the end of the day is “Does it work” and “Does it look good?”. If you make a friction it should be precisely that, a device that creates friction to achieve its function of preventing movement. If it fails in that function, it might as well not be there. The sky won’t fall in if you use one friction as opposed to another or tie anti-clockwise but you might get ex-communicated by your chosen ryu 😉 If you like, you can let which hemisphere you are in determine which direction you tie your gote but I think it is smarter to think about your tying.
Sabaku 捌
Dexterity in avoiding friction movement. Flying rope. “Meters of rope rub against the skin”. Applying a good technique in handling the ropes prevent the skin of the person tied experiencing unnecessary friction and fatigue, unanticipated pinching or getting hit with the knots on the ends of the rope. Every good rigger ensures that none of these things happen without having planned or agreed to previously. (Source: Notes on Osada-ryu)